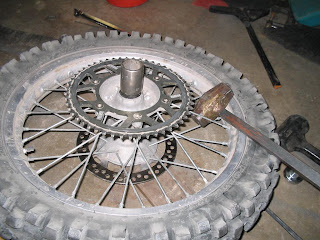
 The rear bearings on my dirt bike needed to
be replaced. I purchased pivot works bearings
from Rocky Mountain Motocross. I have always had
good luck with pivot works. They are good
quality and come with everything you need.
I decided to go ahead and purchase the tusk
anodized aluminum axle blocks at the same
time since I would be removing the old ones
during the installation.
I also got a motion pro bearing tool to remove
the lock collar. A good source for these and other tools and parts is BikeBandit.com
The first step is to get the bike up in the air and
remove the rear wheel. After loosening the axle
nut, you just tap the axle out with a rubber mallet. The RB components lift stand makes
getting the motorcycle up in the air easy.
Here is a pic of the rear wheel off the dirt bike. You
don't have to remove the chain or the rear brake
from the bike.
Now put the special tool on the locking ring and
twist it off.
The lock/retaining ring came off very easily on
my bike, but getting it to fit over the seal was a
little bit of a hassle. The seal could probably be
removed with a screwdriver first to make it
easier.
Use a large screwdriver to remove the seal from
the other side.
Use a large screwdriver again to tap the bearings out from the opposite side. you will need to
move the spacer to one side or the other in
order to expose a surface of the bearing on one
side or the other to tap on. Tap on alternating
sides to tap them out gradually. There are two
bearings on the drive side, and one on the brake
side.
Here is the spacer that is located between the
bearings. Don't forget to put this back in
between the new bearings!
Now, just get a big..hammer, and a socket of the
correct size and tap the new bearings in. This is
where you need to remember the spacer before
you pound bearings in both sides.
Now install the new lock ring if your bearings
came with one. I made the mistake of installing
the seal onto the lock ring before I tightened it
down, it would have been easier to tighten it
down and then put the seal on, simply because
the seal gets in the way a bit.(mental note for
next time) Tap the seal in the other side also.
After you put the spacer back on, the wheel is
ready to go back on. I didn't oil the seals before
I pushed the spacers through, another good
idea for next time.
The finished product! The axle blocks look good,
and the allow you to move the tire back without
turning the adjustment screws out to far thus
making them weaker. They can be installed
either way depending on axle placement.
This is also a good picture
of the pro taper sprocket I installed about two
months ago. I couldn't see any wear yet..it seems to be holding up well considering that it is an
aluminum alloy sprocket as opposed to steel.
- Blue Lake, Arapeen ATV Trail
- Caineville/Swingarm City
- Farmington Canyon
- 5-Mile Pass
- Knolls Recreation Area
- Little Moab(AKA Nutty Putty)
- MOAB
- Providence Canyon
- Bountiful Canyon, Tuttle's Loop Trail
- Skyline Drive, Sanpete County
- White Wash Sand Dunes, Moab
- Centerville ATV Park
- Listing Of All Popular Moab Trails
- Sunline Lever Review
- Buggy Brakes Upgrade
- 1998 50sx 2-stroke KTM Engine and Clutch Rebuild
- Steel Reinforced Aluminum Rear Axle Spacers For Dirt Bikes
- Swingarm Linkage and Upper Shock Bearing, CR250
- Replacing Dirt Bike Linkage Bearings
- How To Replace Dirt Bike Swingarm Bearings
- Dirt Bike Bottom End Rebuild
- "Trailgate" Project, Custom Tailgate For Hauling Dirt Bikes
- How To Change a Dirt Bike Tire
- 2-stroke Top End Rebuild
- Sunline Vince V1 Break-Away Levers
- Trailer Tech, Patch Panels, Dinette Upgrade Etc.
- ODI Grips, Sunline ARC Unbreakable Levers, 2001 CR250
- Trailer Tech, New Dinette Install
- How To Replace Dirt Bike Wheel Bearings
- Leo Vince X3 Exhaust, 2004 Suzuki DR-Z 110
- Dirt Bike Throttle Stop/Limiter, DIY
- Galfer Brake Rotor, Stomp Traction Pads, Pro-Taper Sprockets 2001 CR250
- 2-Stroke Engine, How it Works
- Dirt Bike Jumping Techniques
- Boyesen Water Pump, Devol Radiator Gaurds etc. 2001 CR250
- Jetting, 2001 CR250
- Steahly Flywheel Weight, 2001 CR250
- Piston & Ring/top end rebuild 2001 CR250
- Rekluse Auto Clutch Installation
- Cherokee Front End Brackets
For the most recent off-road news, trail reports, tech articles, dirt bike tips and more...
How To Replace Dirt Bike Wheel Bearings, 2001 CR250
Related Links,


