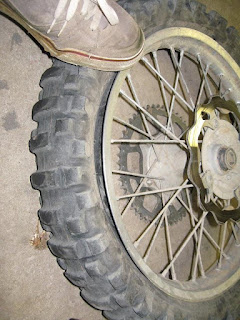
 As you can see by this picture it was time for a new tire. I have had this tire for a year and it held up fairly well considering the amount of riding I did on it. The old tire was a dunlop D952 and the new tire is a Maxxis "Desert Terrain" I have been happier with this Maxxis tire than the dunlop for overall wear in the desert/rocky areas I tend to ride most often, so I thought I would stick to it.
First I remove the tire by removing the axle nut and tapping it out with a rubber mallet. If it's a little sticky like mine was, you'll need to get a punch to finish tapping it through.

Pull the axle out and remove the wheel.

The first step to removing the tire is to break it off the bead. usually you can get it off by just using your own weight on the side of the tire. Break it off all the way around and position the bead in the lowest part of the rim.

You'll need at least two tire levers for this job. Sometimes more make it easier, but I usually just use two. Just work around until you get the first side off the rim. The one thing to remember here is that this job is going to take some energy to complete. The tire is big and stiff and takes considerable force to get it off, so be prepared to work!

Here is the second side. Once you pry about 8" to 12" away from the rim just muscle it off by pushing straight down on the tire from the top towards the hub.

I decided to spend the buck or so for the new rim strip. I was actually surprised to see that the new one was thicker and wider.

Start the new tire like so. Get the lever in and work around the bead, remember to get the bead that is already on the rim into the very lowest(middle) part of the rim or it won't go on.


After working the first side on, insert the rim lock into it's proper position and spin the nut on a little to keep it in place.

I find it much easier to install the tube with a little air in the tube. These "Ultra Heavy Duty" tubes actually make it easier in my opinion. You just want the tube to hold it's shape enough to not get folded when you are putting it in.

Now is the time to get the valve lined up with the hole. Make sure it's positions correctly here to avoid more work or a broken valve later.

Now just pry the second bead on. Make sure not to pinch the new tube between the levers and the rim or you'll be doing it again.


 Bingo! You can see the sweat on my arm..it's not easy, but it's not all that hard either. Like I said, just be prepared to work a little.
 At this point you need to air it up to get it to pop onto the bead. Sometimes I use a tiny bit of lube so I don't have to pump it up to far to get the bead to set. Other times I get it close and ride it for a few minutes and it usually will pop on.
 Now that's some meat! Ready to rip!
 Now that's some meat! Ready to rip!


